{CheatHappens.com}")


Using this Trainer:
Launch the trainer first, then launch the Game and then Press F1 at the Main Menu.
Listen for "Activated".
Press desired option key
Options in Promo:
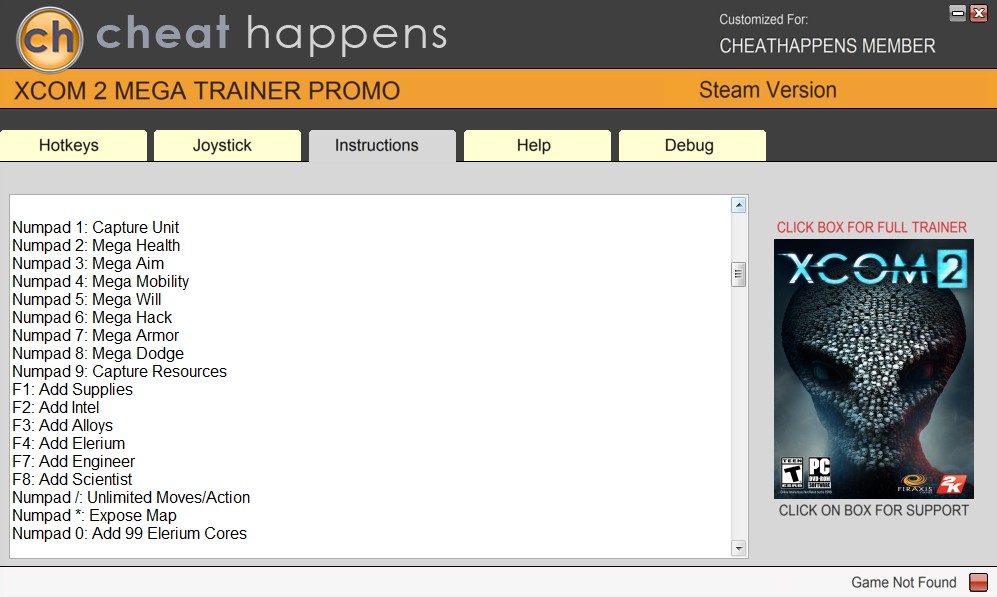
Numpad 1: Capture Unit
Numpad 6: Mega Hack
Options:
Numpad 1: Capture Unit
Numpad 2: Mega Health
Numpad 3: Mega Aim
Numpad 4: Mega Mobility
Numpad 5: Mega Will
Numpad 6: Mega Hack
Numpad 7: Mega Armor
Numpad 8: Mega Dodge
Numpad 9: Capture Resources
F1: Add Supplies
F2: Add Intel
F3: Add Alloys
F4: Add Elerium
F7: Add Engineer
F8: Add Scientist
Numpad /: Unlimited Moves/Action
Numpad *: Expose Map
Numpad 0: Add 99 Elerium Cores
Notes:
Numpad 1: Capture Unit - to use this you must first click away or tab away from the character you wish to affect. Or if you are in the barracks, use the arrows at the bottom of the screen to move to a different character. Next, press this button and then select the character you wish to affect with the next options (or click the arrows to get to the character you want if you are in the barracks). You can then modify health, aim, etc. You have about 2 seconds to click on or select the unit you wish to affect before this option turns off.
Numpad 2: Mega Health - make sure you have used the Capture Unit option properly and then press this option key to modify the value. If you are in combat, you will not notice it has changed until you have moved. The value written can be modified using the custom trainer ability.
Numpad 3: Mega Aim - make sure you have used the Capture Unit option properly and then press this option key to modify the value. If you are in combat, you will not notice it has changed until you have moved. The value written can be modified using the custom trainer ability.
Numpad 4: Mega Mobility - make sure you have used the Capture Unit option properly and then press this option key to modify the value. If you are in combat, you will not notice it has changed until you have moved. The value written can be modified using the custom trainer ability.
Numpad 5: Mega Will - make sure you have used the Capture Unit option properly and then press this option key to modify the value. If you are in combat, you will not notice it has changed until you have moved. The value written can be modified using the custom trainer ability.
Numpad 6: Mega Hack - make sure you have used the Capture Unit option properly and then press this option key to modify the value. If you are in combat, you will not notice it has changed until you have moved. The value written can be modified using the custom trainer ability.
Numpad 7: Mega Armor - make sure you have used the Capture Unit option properly and then press this option key to modify the value. If you are in combat, you will not notice it has changed until you have moved. The value written can be modified using the custom trainer ability.
Numpad 8: Mega Dodge - make sure you have used the Capture Unit option properly and then press this option key to modify the value. If you are in combat, you will not notice it has changed until you have moved. The value written can be modified using the custom trainer ability.
Numpad 9: Capture Resources - you must use this option FIRST before using any of the research options below. First, make sure you are inside the Geoscape ship. Click on the Armory section of the ship. Next, click this option and then click ESC to leave the armory. The option activates and then deactivates in about 2 seconds. You need to press ESC and leave the armory before the 2 seconds is up.
F1: Add Supplies - make sure to use the Capture Resources option above before using this. Each press adds more. You may need to go to the Armory again and then back to see that the values have changed. Also, it's best to use this only RIGHT AFTER you use the Capture Resources option. Using this option after you start research, or build something the resources locations in memory may have changed.
F2: Add Intel - make sure to use the Capture Resources option above before using this. Each press adds more. You may need to go to the Armory again and then back to see that the values have changed. Also, it's best to use this only RIGHT AFTER you use the Capture Resources option. Using this option after you start research, or build something the resources locations in memory may have changed.
F3: Add Alloys - make sure to use the Capture Resources option above before using this. Each press adds more. You may need to go to the Armory again and then back to see that the values have changed. Also, it's best to use this only RIGHT AFTER you use the Capture Resources option. Using this option after you start research, or build something the resources locations in memory may have changed.
F4: Add Elerium - make sure to use the Capture Resources option above before using this. Each press adds more. You may need to go to the Armory again and then back to see that the values have changed. Also, it's best to use this only RIGHT AFTER you use the Capture Resources option. Using this option after you start research, or build something the resources locations in memory may have changed.
F7: Add Engineer - this option requires that you have turned on the developer console in the game. Instructions to do that are included below. To use this option, make sure you are in the Geoscape Ship. Press this key and the game will add 1 more of this type to the game. Look at the *HOW TO TURN ON THE DEVELOPER CONSOLE! instructions below.
F8: Add Scientist - this option requires that you have turned on the developer console in the game. Instructions to do that are included below. To use this option, make sure you are in the Geoscape Ship. Press this key and the game will add 1 more of this type to the game. Look at the *HOW TO TURN ON THE DEVELOPER CONSOLE! instructions below.
Numpad /: Unlimited Moves/Action - this option requires that you have turned on the developer console in the game. Instructions to do that are included below. The best time to use this is BEFORE you have already moved a unit. Press this key and the unit can likely move around and perform many many actions before losing turn. Look at the *HOW TO TURN ON THE DEVELOPER CONSOLE! instructions below. Note, also, that if a unit has lost it's turn and you CLICK on it and then use this option, many times you can continue using the unit again!
*: Expose Map - this option requires that you have turned on the developer console in the game. Instructions to do that are included below. Toggle this option to expose parts of the map that are hidden by the fog of war. THis may or may not also expose aliens who are hidden, but not always. Look at the *HOW TO TURN ON THE DEVELOPER CONSOLE! instructions below.
Numpad 0: Add 99 Elerium Cores - this option requires that you have turned on the developer console in the game. Instructions to do that are included below. Press key to add 99 when you are in the Geosphere Ship. Look at the *HOW TO TURN ON THE DEVELOPER CONSOLE! instructions below. The way that the game functions, you must have at least ONE already for the option to work. Check the Inventory in Engineering to see your Elrium Cores total.
*HOW TO TURN ON THE DEVELOPER CONSOLE! You must go to where you launch the game through steam. Click LIBRARY. Scroll down to XCOM 2 under the GAMES row. RIGHT CLICK on XCOM 2 and then click Properties. Next, click the SET LAUNCH OPTIONS button. Add the following text to the input box:
-allowconsole -log -autodebug
Click OK and then CLOSE. Run the game normally and then you can use the Add Engineer and Add Scientist options.